DIY-ers can easily complete a few minor projects – and some major as well – without worrying about the specifics. There are several ways to go about any given project, no matter the complexity. However, when it comes to the retaining wall, it is important that you dot your i’s and cross your t’s.
Retaining walls are a crucial element of any given project, and one of the most important considerations therein is the maximum slope without a retaining wall, or at what slope do you need a retaining wall?
The maximum slope for the soil you can safely go without a retaining wall is 35 degrees, especially if the soil is granular. If the angle is steeper, you will need a retaining wall to keep everything in place. The lean should be a minimum of 1:12 (1 inch per 12 inches of height) to ensure the load is distributed evenly on the wall. Not only that, but this height-slope ratio also ensures proper drainage of the soil.
Retaining Walls – The Specifics
If you’re landscaping, you’ll find that working on a sloped part, or even a sloped site can be rather difficult. You then have several options; either use an excavator to start cutting the slope and flattening it all out. Or you could take advantage of the landscape and build a ‘tiered’ landscape.
The first option is relatively easy but extremely expensive. Working on sloped landscapes, however, require you to know the ins and outs of your site, have a robust design in place, and most importantly, have a retaining wall that can support your sloped landscape. Remember; albeit difficult, sloping landscapes offer some of the most beautiful and innovative ideas out there.
It gives you a chance to create stunning views, different zones, and even include tunnels and bridges if you’re feeling adventurous!
Retaining Walls – What Are They?
You know how there is always a wall at the back of a sloped landscape in almost every garden? It’s usually made up of natural rocks bonded together with either concrete or a bonding mix. That’s a retaining wall.
These are rigid walls that support soil by being holding its weight. These walls stand upright, preventing the soil from flowing – even when watered. These walls can help retain soil at different levels on both sides, but it’s uncommon to see two slopes retained by the same wall. If there are two slopes originating from the same peak, chances are that you won’t need much of a retaining wall since both slopes are likely to cancel each other’s weight out.
The goal of a retaining wall, as evident from the explanation above, is to hold sand/soil in a slope that it wouldn’t stay fin naturally. Where one side contains the slope, the other is freestanding and often exposed.
There are several types of retaining walls.
- Anchored walls. These are walls are the most stable sort of retaining walls. The anchor is wrapped around the wall while its base is deep within the ground; thus being stabler.
- Gravity retaining walls. Gravity retaining walls have immense weight on them as slopes usually originate (upwards) from these walls. These should be used for short slopes, i.e., for no more than 3 feet of soil.
- Piling walls. As the name suggests, a pile (or long pole) is driven into the ground made up of metal or wood. Due to their deep foundation, these walls can hold more weight than ordinary gravity retaining walls.
- Cantilever walls. These walls are also driven into the ground but there is one major difference; they have a base known as the ‘arm’ that extends inwards; into the hill. This way, the wall uses soil’s own weight to counter the force it is applying to flow out, thus stabilizing the whole thing.
The slope of a Retaining Wall
When designing a retaining wall, make sure you know what you’re doing or have consulted an engineer. These walls are going to hold immense weight if they fall, so make sure that doesn’t happen.
Regardless of the type of wall you use, the maximum slope of the soil should be no more than 35 degrees. Any more, and rain or excess watering will lead the soil to flow with the water; not to mention how it will compromise the integrity of your wall.
Retaining walls can be made out of a number of different materials. These include, but aren’t limited to;
- Rocks (gabion)
- Wood
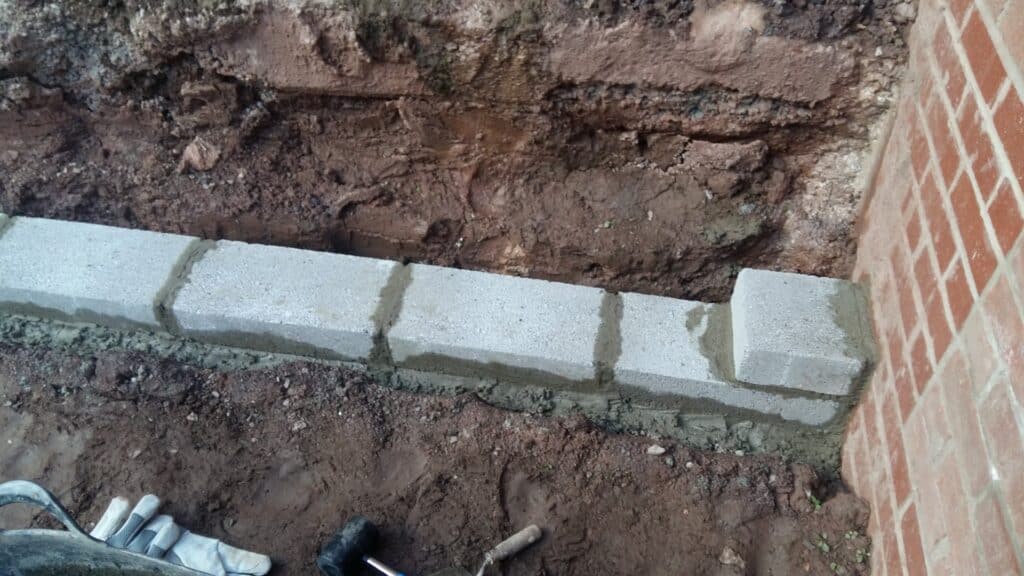
- Stone
- Bricks, or
- Concrete
These materials don’t make much of a difference in most cases, except if you’re using untreated wood (it will most definitely rot away after a couple of years). The most important elements to consider when choosing which material to choose include aesthetics and drainage.
Building a Retaining Wall
When building a retaining wall, another important consideration you need to make is the 1:12 ratio we mentioned above. This means that for every 12 inches of your wall’s height, you should consider leaning it into the hill by 1 inch.
If you’re using wood for your retaining wall, anything above 4 feet should be tied tightly with a rope or “deadmen” anchors with the hillside. Deadmen anchors are long tiebacks, mostly t-shaped. You can also make your own anchors; all you would need is a strong rope and some pieces of wood.
These tiebacks are buried in the hillside and attached to the timber every 8 feet. The tieback itself should be 6 feet deep in the soil and the hook needs to be 2 feet wide in order to give you the optimal holding strength and capacity.
Depending on the material you’re using, the technique will also vary. Some prefer using interlocking concrete blocks and pouring concrete within, riprap (loose rock) areas, concrete plus rock (gabion), terracing and wood retaining walls, and more. Just remember, if you’re using concrete blocks, fill them with concrete only. If you’re using wood, make sure it’s treated or it will rot pretty quickly.
If the retaining wall you’re trying to make is higher than 3 feet, make sure you check any zoning codes or regulations that need to be followed. You can go with a 1:10 inches ratio, especially if you’re using concrete blocks with concrete filling, but the safest bet is always a 1:12 inch rule when it comes to retaining walls.
Place drainage tiles or holes in the wall to ensure there is no water build-up at bays. The majority of the water will flow downwards, but if you plant anything other than grass on the slope, chances are that water will make a route along the retaining wall.
To eliminate the risk of damage from this water, place drainage tiles under a 12-inch layer of backfill, such as gravel.
Cost of Building a Retaining Wall
The cost of your project will depend entirely on the type of wall you’re making and the material you choose to use.
Wood
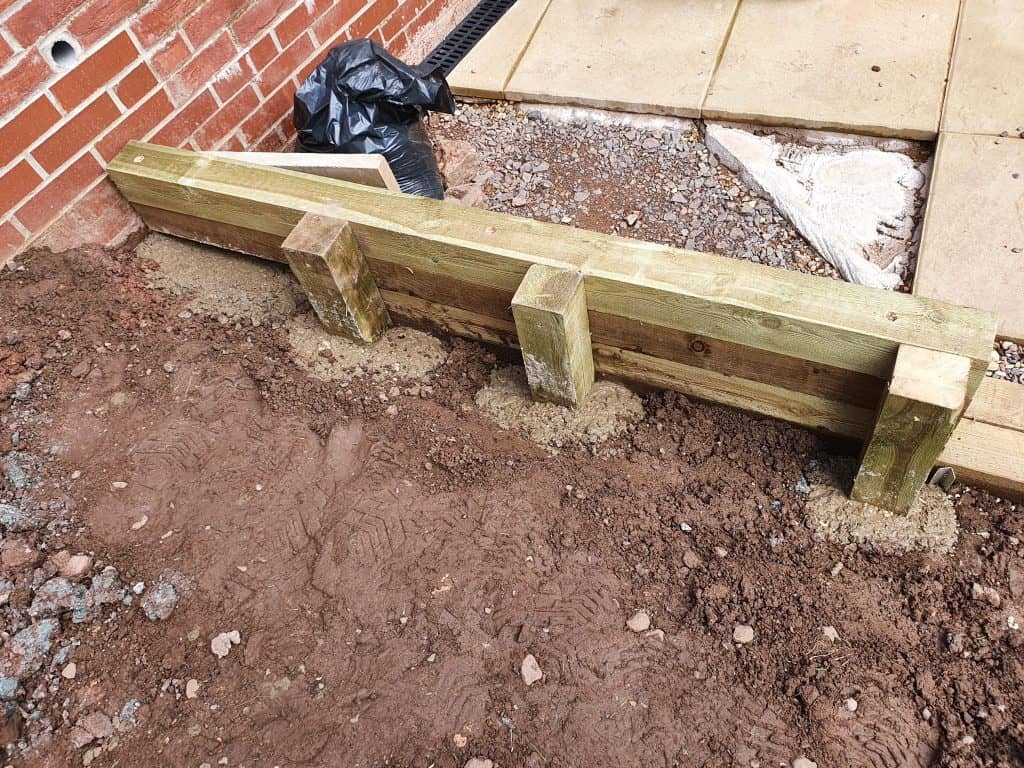
On average, a wooden retaining wall costs about $10-$12 per square foot. This also depends on the wood you’re using. Cheaper isn’t really better here, but you shouldn’t go for high-end wood, either. Even pine will do, provided it’s treated.
For a 100 square feet wall (20 feet long and 5 feet high), you may have to spend around $1,000. At the same time, if you hire professionals, the average cost can be $28 to $30 per square foot. The same project would cost roughly $2,800-$3,000.
Stone/Brick
The main cost involved here is that of stone and brick stacking. If you are doing it yourself, expect to save about 45% to 50% of total costs. The hourly cost for dry stacking rocks is $65. If you have an excavation site near you, you can potentially get stacking rocks for free!
Bricklaying costs $15 to $25 per hour. It doesn’t matter whether you choose the expensive or cheaper option here. On average, a face brick costs $6 per square foot. 1,000 solid bricks can cost somewhere between $340 to $900.